While your application, photo ID and selfie ID are being reviewed by the Creator Support team, you can upload your first clip!
Click the "upload my first clip" button to proceed to the uploader.

If your clip is not ready yet, no worries! Skip for now and once ready, you can find the "upload first clip" button on your dashboard.
Before you continue, you must check off the Compliance Affirmations and press "I Certify" to redirect to https://admin.clips4sale.com/clips/show to upload and add your first clip!

What's required when adding a clip?
Content Classification - choose your clip classification and check relevant certifications:
- SOLO PERFORMER - The content I am uploading features ONLY MYSELF (the store owner) and no other performer.
- MULTI PERFORMER - The content I am uploading features MULTIPLE PERFORMERS or a SINGLE PERFORMER (not the store owner).
- AUDIO ONLY - The content I am uploading is AUDIO ONLY and does not contain any visual depictions of real performers.
- ANIMATED ONLY - The content I am uploading is ANIMATED/COMPUTER GENERATED ONLY and does not contain any visual depictions of real performers.
- EXEMPT - The content I am uploading was filmed/produced BEFORE NOVEMBER 01, 1990 and is exempt from 2257 documentation.
- PUBLIC DOMAIN - The content I am uploading is in the Public Domain and was filmed/produced BEFORE JANUARY 01, 1978.

ℹ️ Each of the Content Classifications (shown above) has specific certifications that need to be checked off when adding a new clip.
Performer Compliance Documentation - How many performers appear in this clip?
Write the number of performers and proceed to add a new performer compliance profile.

You're gonna need Performer's:
- Stage/model name
- Date of birth
- Photo ID
- Consent Form

ℹ️ Make sure the ID/consent form filename has no blank spaces or special characters.
Click the "Save Performer" button and select your saved performer profile from the list

Now proceed to add your clip title, description, category, related categories (optional), keywords (optional), and upload your first clip from the "Clip Name" section.
Drag & Drop your clip here, or use the "Add Files..." button and press the "Start Upload" button.

The next step is to set the preview settings, you're doing great!
Choose to create a preview using our preview creator, upload your custom preview, or use the auto-generated 10-second preview.
- Max preview length is 60 seconds if you'd like to upload your own or create one using the preview creator.
- The auto-generated preview is 10 seconds long and can start at start of the clip, 10 seconds from the start, 1/4 of the clip, half clip or 3/4 of the clip.

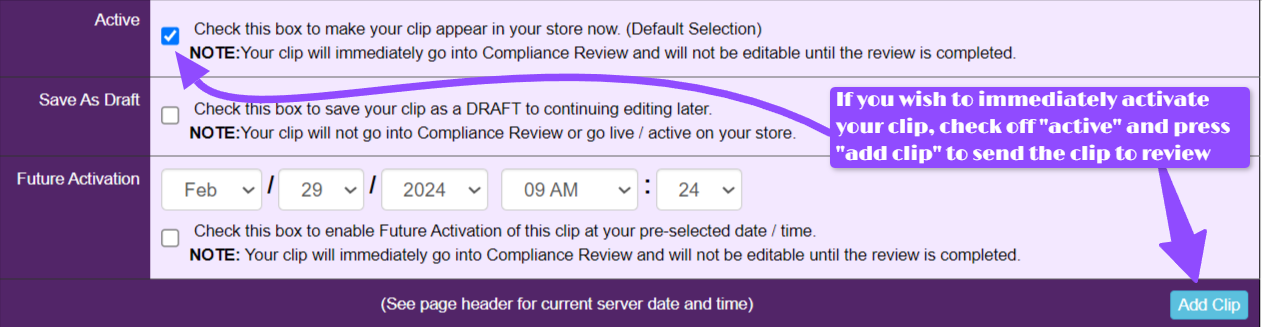
After choosing your preferred preview method, it's time to choose your clip price from the dropdown, and before pressing the "add clip" button at the bottom of the page, make sure the "active" box is checked off to immediately send the clip into Compliance Review and once approved, it will show up on your store.
- If you selected to SAVE AS DRAFT to continue editing later - your clip will not go into Compliance Review or go live/active on your store.
- If you selected FUTURE ACTIVATION to post your clip at a later date and time - your clip will immediately go into Compliance Review and will not be editable until the clip has been activated on the site.
You'll find your Under Review clip on the Dashboard under "Recent Clips" and once it is reviewed and approved, it will go live in your store.
Keep an eye out for an email from Compliance.
