You can access Customs from your Creator Workspace - https://workspace.clips4sale.com/customs

- Manage My Customs - View, accept, produce, and deliver custom clip requests.
- My Custom Request Form - See the Custom Request Form exactly as fans see it.
- Settings - Set pricing, delivery times, resolution options, and availability.
- Add-Ons - Create paid extras that fans can add to custom requests.
Once you're on the C4S Customs management page, the upper right corner should display the Store ID# you are logged into, and the header will display Jobs, Settings, Add-ons and Promo.

1 - Settings Overview
The Settings section is where you can configure your Custom Clip Request Form. The form uses these settings to automatically calculate the final price of a customer’s custom clip request based on:
- Your pricing rules.
- The customer's selected options.
Base Pricing
- Price per Minute - Determines the clip’s base cost.
- Min Duration - The shortest the clip can be (in 5-minute blocks, ie: 5, 10, 15, 20, etc).
- Max Duration - The longest the clip can be (in 5-minute blocks, ie: 5, 10, 15, 20, etc - max 120 minutes).
Exclusivity Option - Customers can request the clip to be exclusive (in this case, the Creator agrees not to post/sell it later) for an additional fee.
- If you enable exclusivity, you can specify a multiplier to increase the price.
- 1.0 = regular base price
- 1.5 = 150% of the base price (50% extra)
- 2.0 = 200% of the base price (double), etc.
 |  |
Note: Checking the box but leaving this field blank means exclusivity is not offered.
Priority Delivery - Customers can pay extra to receive their clip within a faster time frame. You can set the additional price for each available tier:
- 24 Hours
- 1 week
- 2 weeks
- If you leave a tier blank, that priority option will not be available.

Resolution Options - If you want, you can offer 4K at an elevated price. If you don't want to offer it, leave the field blank.

Notes for Customers - A free-text field where you can add information to your custom request form, which is visible to all customers, such as:
- Boundaries or content they do not produce
- Specific instructions
- Additional terms

After creating your custom form, make sure to enable it by checking the Activation box and saving your settings. If the form isn’t activated, customers will see a “Not Available” screen when visiting your custom URL and won’t be able to place custom orders.

After saving the custom video settings, our moderation team must review them before they become available to customers.

Once approved, the status will change to Settings Approved and the form will be visible to customers.

2 - Add-ons Overview
On the Add-ons page, you can create and manage optional extras that customers can select (e.g., custom outfit, say their name, etc.). Add the add-on name, description (optional) and price (USD), then click "add option" button.
Note: Add-ons are also reviewed by the Moderation team and become available in the custom form once they are accepted/approved.

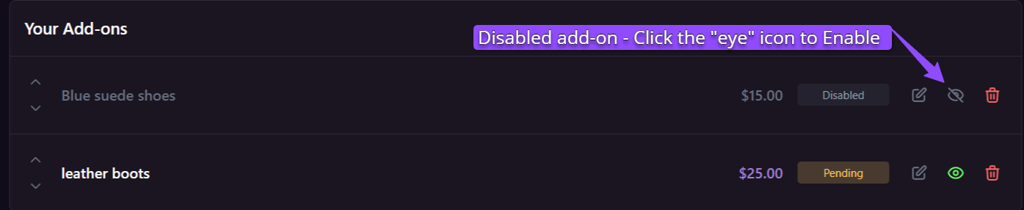
Add-ons can be moved up and down in the list, edited, disabled/enabled and deleted.
3 - Promo
https://customs.clips4sale.com/admin/promo
Here you can create promotional videos and images to showcase on your Custom form. You can add multiple promo videos, but only one can be live at a time.

Promo video needs a title, performer profile(s), description, cover image (thumbnail) and can be set to be live from/to dates.
When you submit your promo video, it will undergo Compliance review and once approved, will be displayed on your form.
Live promo video can be hidden, edited or deleted.

4 - Your Custom Jobs
After your Custom Clip Form has been reviewed and accepted by Moderation team, you can share your custom link directly to customers via C4S Chat and Bulk Messaging.
- Your custom clip link: https://customs.clips4sale.com/Your_Store_ID
When the customer fills out the form, the estimated total is displayed at the bottom based on everything they selected. Customer clicks ‘Submit Request’ and their custom clip request goes to our Moderation team for review.
- Once it’s approved by Moderation, it appears in the JOB section of the Customs Admin under Action Required tab - https://customs.clips4sale.com/admin/customs
- You can view, reject (with note) or accept the custom request from here.

When you accept the custom, you send the proposal back to customer - here you can change the final price or leave it as is.

You now wait for the customer to accept the proposal and send you a tip payment for the custom clip. Once you receive the tip, you can mark the job as Paid.
- From this moment, you have the timeframe specified in the custom order (default is 4 weeks unless the customer selected a rush option such as 2 weeks, 1 week, or 24 hours) to deliver the clip and mark the job as complete.
- When the delivery date is approaching, you will receive an email letting you know a refund might be issued if the clip is not delivered on time. If you need more time, you should discuss any extension with the buyer in Chat before the deadline.
4 - When The Clip Is Ready
- When you have filmed the custom clip, go to your Custom Jobs at https://customs.clips4sale.com/admin/customs
- Click "Upload" for the Job # and select the clip from your device.
- Choose pre-existing performers appearing in the clip (if you do not see the performer in the list, refer to your Creator Workspace to add a new performer).
- Click "Complete Upload"
The clip will then undergo Compliance Review and once approved, it will be delivered to the customer via Chat and the status will change to Published.


Commission & Payouts
Creators earn 80% commission on all custom clip sales, giving you a significant share of the revenue. Payments for customs are included with your regular monthly payout, so once a month all earned payments from custom requests will be deposited along with your other earnings.
Related Article(s):